

In this workshop, we're going to create a Discord bot that allows users to save custom messages that they can have the bot send at any time. By the end you will have programmed a sweet bot to add to your Discord server!
Bot Setup
Let's set up a bot through Discord before creating its features! Click here.
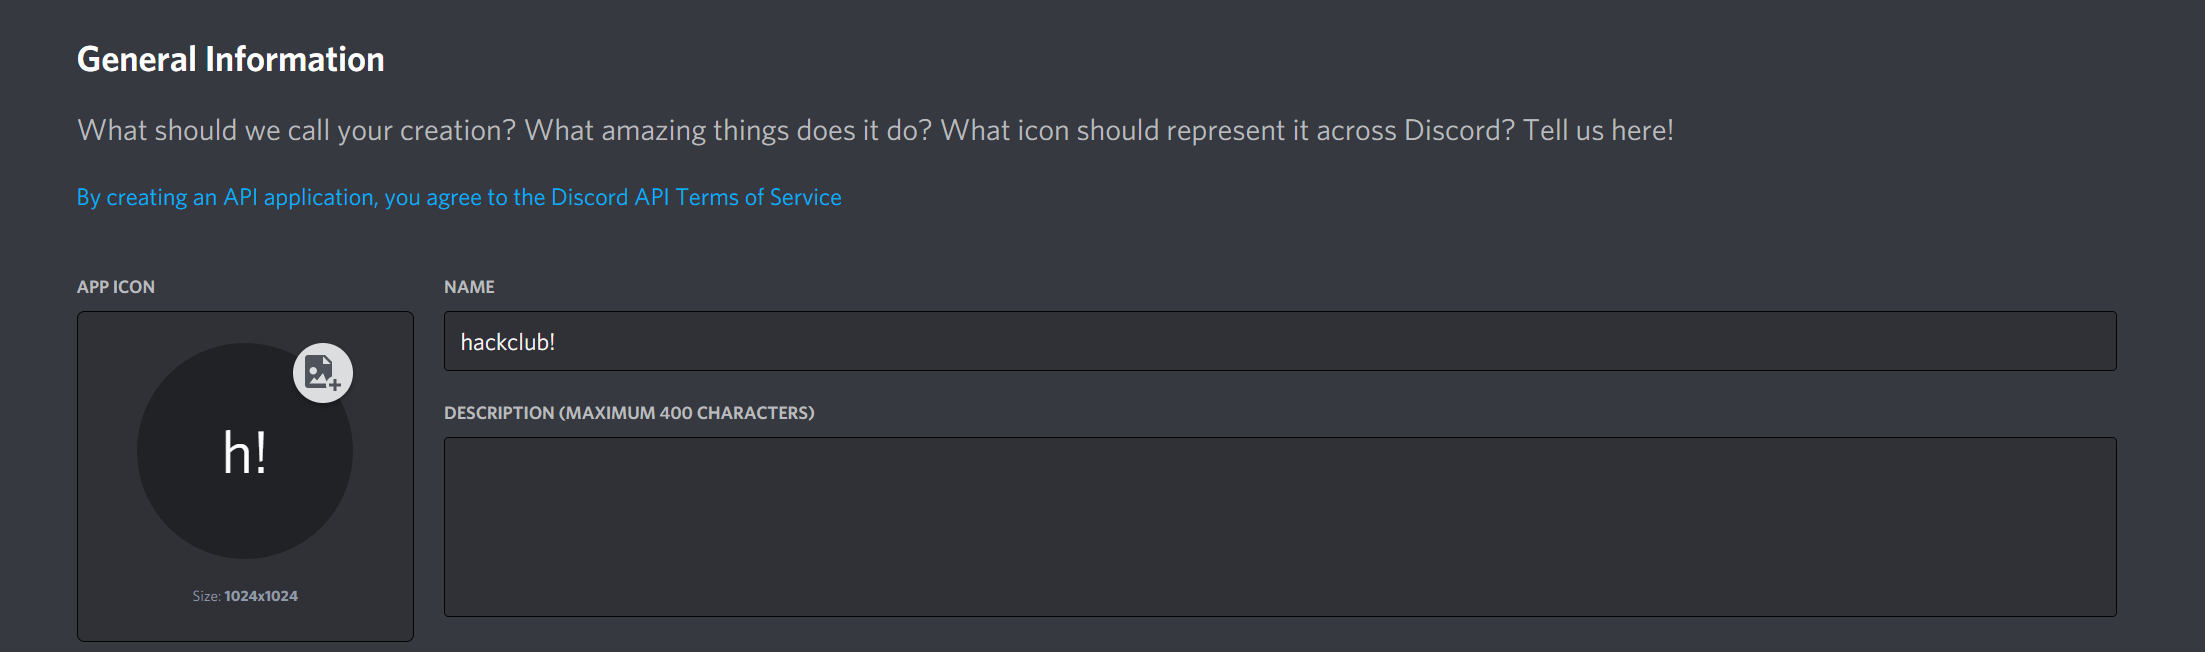
Click the "New Application" button at the top right.

This creates a new bot where you can customize the name, description, and profile picture!
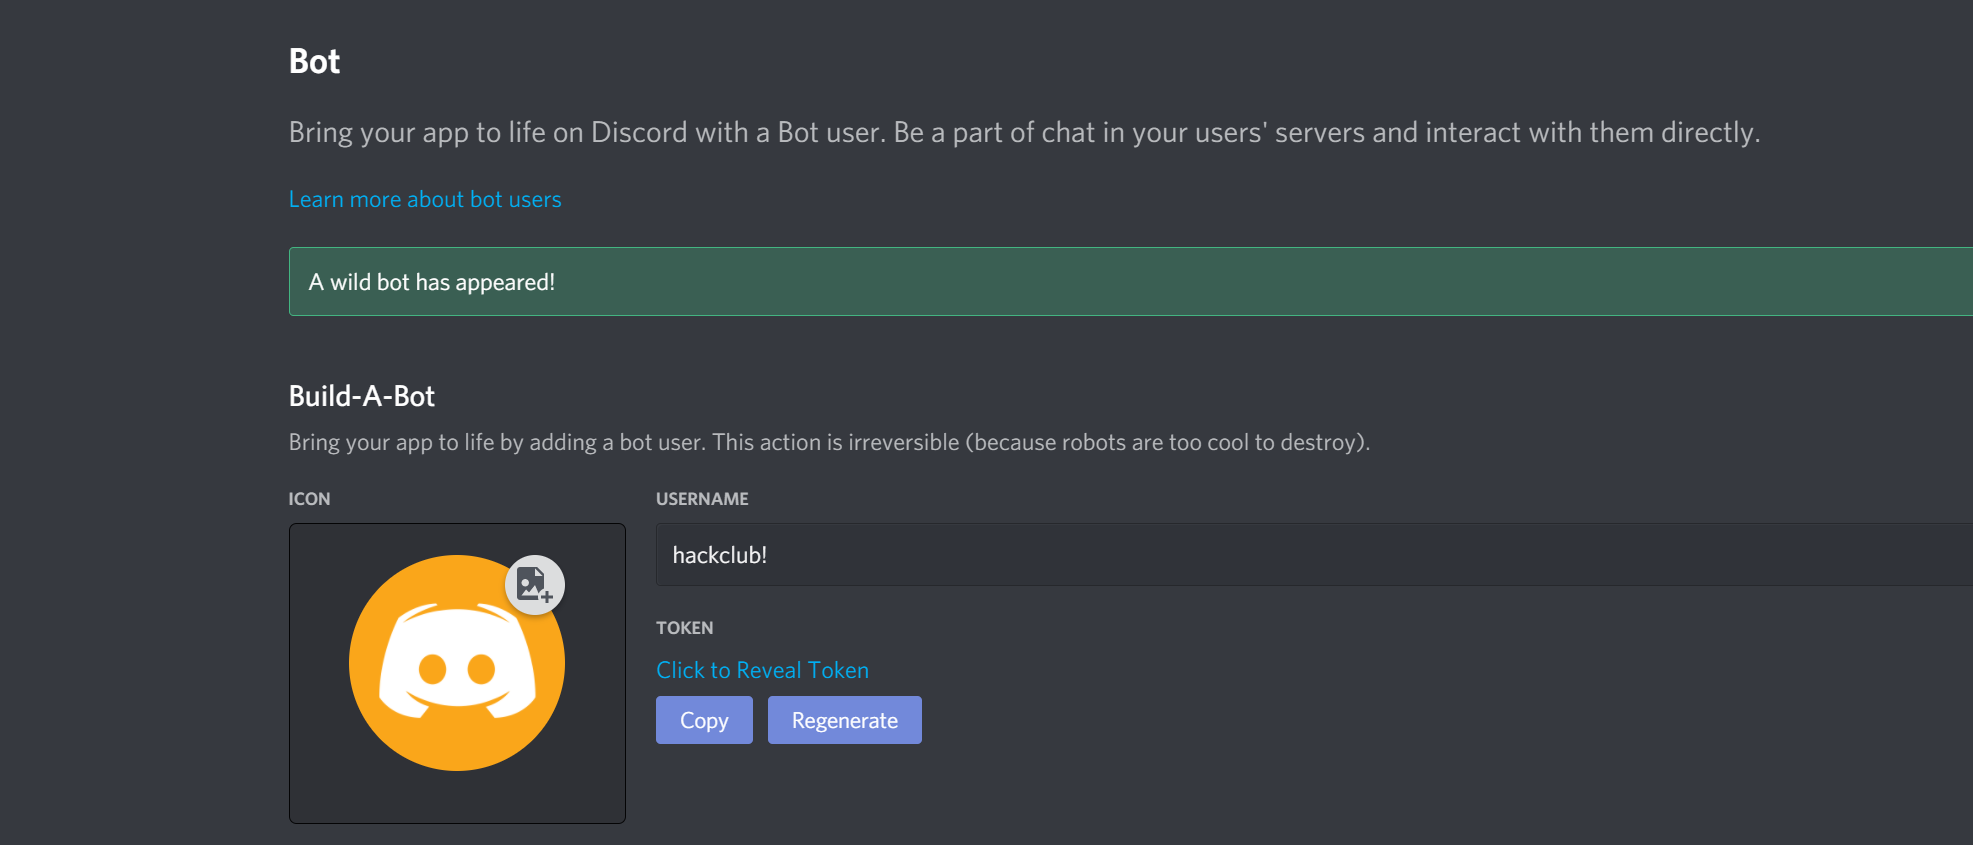
Now click the "Bot" tab on the right side of your screen.
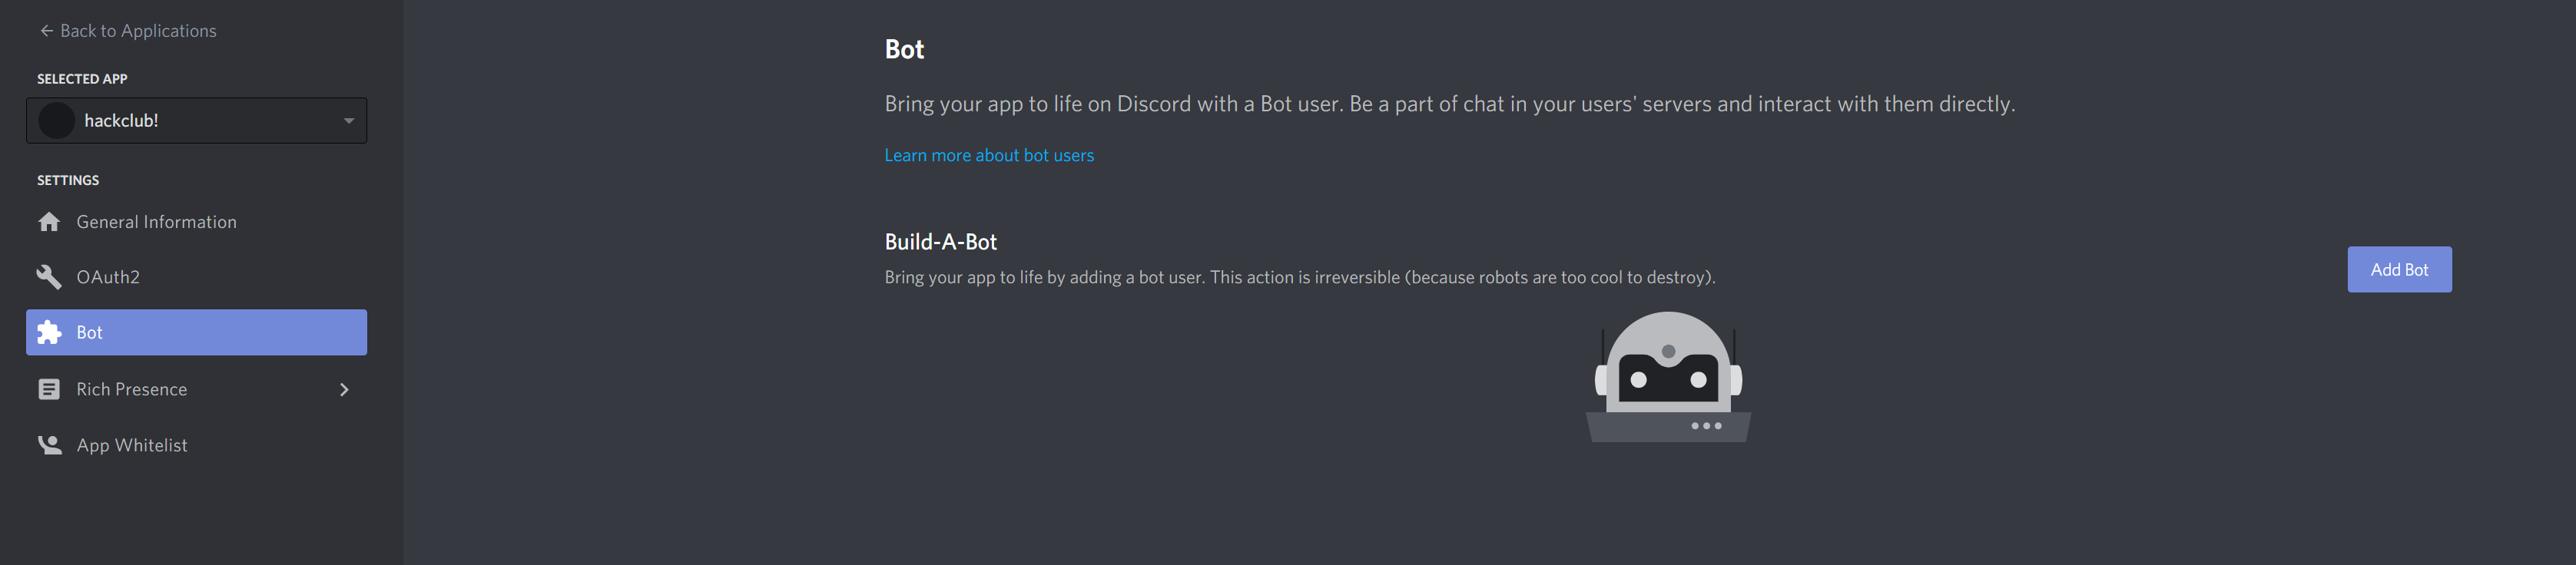
Click "Add Bot" to generate a bot token. This identifies the bot. Give it to nobody!

Repl.it Setup
We're going to use Repl.it to host the bot. It is an online IDE that makes it easy to setup and run the bot!
Create a new repl and use Node.js as the language.
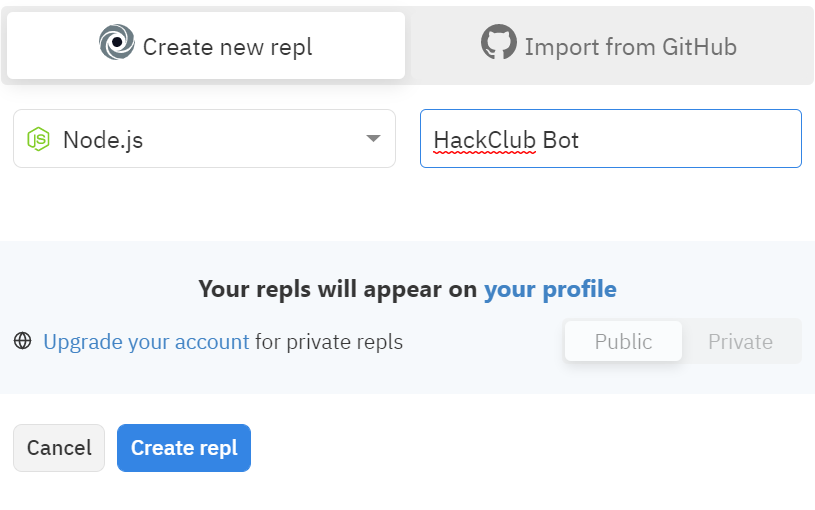
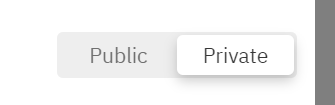
Make sure to set it to private. You'll be adding sensitive information to this project, so you don't want other people accessing your code.
Initial Setup
Let's start coding!

You should see a file called index.js. This is where you'll write the code for the bot.
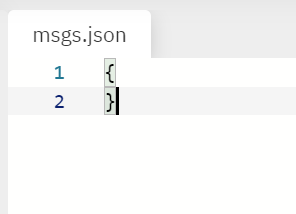
But first, create a file called msgs.json by clicking on the "Add file" button at the top left of your sidebar. This file is where your bot's messages will be stored.
JSON is a file format that allows you to store data as a JavaScript object (key/value pair). If you want to learn more, check here.
Once you create the msgs.json file, add two curly braces, like so:
Writing JavaScript!
In your index.js file, start off by adding the following code. It will be explained below.
const Discord = require('discord.js')
const client = new Discord.Client()
const fs = require('fs')
client.msgs = require('./msgs.json')
prefix = '!'

client.once('ready', () => {
  console.log('Ready!')
})

client.on('message', (message) => {})

client.login('token') // make sure you replace token with your bot token
Let's start by explaining what the prefix is. It allows you to use an exclamation mark to call the bot! Some people have other prefixes such as a dash or pound symbol. It is up to you!
prefix = '!'
Now let's explain these lines.
const fs = require('fs')
client.msgs = require('./msgs.json')
fs is a file system node module. It allows you to interact with file systems, which we will need later when writing to your JSON file.
We then specify that our JSON file will have messages written to it.
Right after the lines where you import everything you need, add:
client.once('ready', () => {
  console.log('Ready!')
})
This code lets you know the bot is on when you run it.
Write Command
Yay! We've successfully completed our initial setup!

Now let's start with a command that allows you to add your own custom messages. The user will provide a key that the message will be saved to and the message itself.
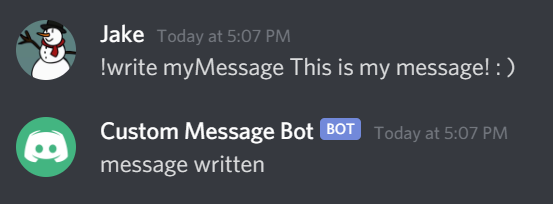
We'll want the bot to respond to !write {messageKey} {message}.
Within your client.on brackets add this if statement:
client.on('message', (message) => {
  if (message.content.startsWith(`${prefix}write `)) {

  }
})
This makes sure your bot command starts with !write. The message.content part of this just looks at the message that the user typed.
Within the if statement, add:
client.on('message', (message) => {
  if (message.content.startsWith(`${prefix}write `)) {
    var tempSplits = message.content.split(' ', 2)
    var keyVal = tempSplits[1]
    var messageVal = message.content.slice(tempSplits[0].length + tempSplits[1].length + 2)
  }
})
These three lines of code seperate the key value and the message into two separate strings.
- The first line splits into two strings into an array based on the spaces. The two represents how big the array will be. Documentation is here. The key value will be the second of the two strings.
- The second line assigns the second array value to the keyVal string.
- The third line takes the original user message and cuts out everything but the message part of the command.
Now, let's add the user to the json file.
client.on('message', (message) => {
  if (message.content.startsWith(`${prefix}write `)) {
  // Code we already wrote previously would be here
    if (client.msgs[message.author.id] == undefined) {
      client.msgs[message.author.id] = {}
    }
    client.msgs[message.author.id][keyVal] = messageVal
  }
})
If the user does not exist in the json, we are adding them. We are doing this based on ID rather than username because every ID is unique.
Then, we are adding the message under the user ID in the json.
client.on('message', (message) => {
  if (message.content.startsWith(`${prefix}write `)) {
  //Code we already wrote previously would be here
    if (client.msgs[message.author.id] == undefined) {
      client.msgs[message.author.id] = {}
    }
    client.msgs[message.author.id][keyVal] = messageVal
    //New Stuff!
    fs.writeFile('./msgs.json', JSON.stringify(client.msgs, null, 4), (err) => {
      if (err) throw err
      message.channel.send('message written')
    })
This writes the message to a JSON and sends a message to the Discord channel to confirm that you saved your message.
Your entire command should look like this!
client.on('message', (message) => {
  if (message.content.startsWith(`${prefix}write `)) {
    var tempSplits = message.content.split(' ', 2)
    var keyVal = tempSplits[1]
    var messageVal = message.content.slice(tempSplits[0].length + tempSplits[1].length + 2)

    if (client.msgs[message.author.id] == undefined) {
      client.msgs[message.author.id] = {}
    }
    client.msgs[message.author.id][keyVal] = messageVal

    fs.writeFile('./msgs.json', JSON.stringify(client.msgs, null, 4), (err) => {
      if (err) throw err
      message.channel.send('message written')
    })
  }
}
Yay! The !write command is done!
Get Command

Now let's do the !get command. This allows you to get the message you saved!
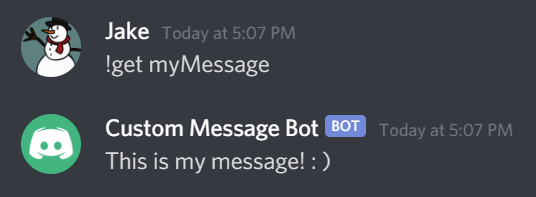
client.on('message', (message) => {
  // The !write command we previously wrote would be here
  if (message.content.startsWith(`${prefix}get `)) {
    let getMessage = message.content.slice(5)
    let _msg = client.msgs[message.author.id][getMessage]
    message.channel.send(_msg)
  }
}
- The if statement checks if the message starts with
!get - The first line in the if statement gets rid of the
!getpart of the message to isolate the message - The second line gets the message in the JSON file.
- The third line has the bot send the message in the Discord channel.
Delete Command

Now, let's write a command to delete a message.
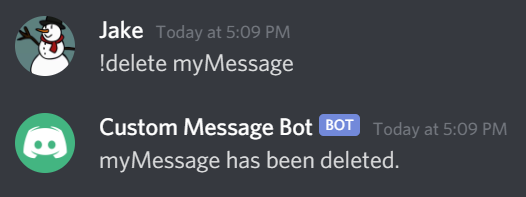
client.on('message', (message) => {
  // The Write & Get Commands we wrote would be here
  if (message.content.startsWith(`${prefix}delete `)) {
    let getMessage = message.content.slice(8)
    delete client.msgs[message.author.id][getMessage]
    fs.writeFileSync('./msgs.json', JSON.stringify(client.msgs))
    message.channel.send(getMessage + ' has been deleted.')
  }
}
- As usual, the if statement makes sure the message starts with
!delete - The first line in the if statement isolates the message
- The second line deletes the message in the JSON
- The third line updates the JSON with the message now deleted
- The fourth line sends a message to let the user know the message was deleted
List Command

Now let's allow the user to get the list of all their saved messages.
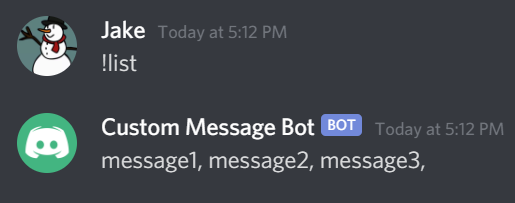
client.on('message', (message) => {
  // The other commands we wrote would be here!
  if (message.content == `${prefix}list`) {
    var messageList = ''

    for (var key in client.msgs[message.author.id]) {
      messageList += key + ', '
    }

    message.channel.send(messageList)
  }
}
- The if statement just makes sure the message starts with
!list - The first line inside the if statement creates an empty string named messageList
- The for loop cycles through all the key value pairs messages that the user has saved.
- The inside of the loop adds the messageKey to the messageList.
- The final line sends the messageList string to the Discord channel.
Help Command

Finally, let's create a help command that allows the user to see all the available commands.
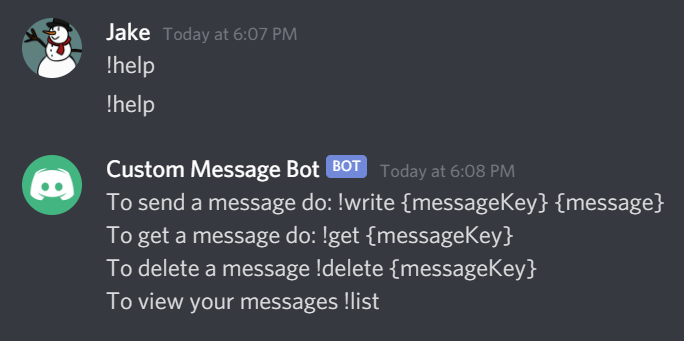
client.on('message', (message) => {
  // The other commands we wrote would be here
  if (message.content == `${prefix}help`) {
    message.channel.send("To send a message do: !write {messageKey} {message}\nTo get a message do: !get {messageKey}\nTo delete a message !delete {messageKey}\nTo view your messages !list");
  }
}
This message just sends a message to Discord with all the available commands. You can add to it if you create more!
Final Source Code
const Discord = require('discord.js')
const client = new Discord.Client()
const fs = require('fs')
client.msgs = require('./msgs.json')
prefix = '!'

client.once('ready', () => {
  console.log('Ready!')
})

client.on('message', (message) => {
  if (message.content.startsWith(`${prefix}write `)) {
    var tempSplits = message.content.split(' ', 2)
    var keyVal = tempSplits[1]
    var messageVal = message.content.slice(tempSplits[0].length + tempSplits[1].length + 2)


    if (client.msgs[message.author.id] == undefined) {
      client.msgs[message.author.id] = {}
    }
    client.msgs[message.author.id][keyVal] = messageVal

    fs.writeFile('./msgs.json', JSON.stringify(client.msgs, null, 4), (err) => {
      if (err) throw err
      message.channel.send('message written')
    })
  }

  if (message.content.startsWith(`${prefix}get `)) {
    let getMessage = message.content.slice(5)
    let _msg = client.msgs[message.author.id][getMessage]
    message.channel.send(_msg)
  }

  if (message.content.startsWith(`${prefix}delete `)) {
    let getMessage = message.content.slice(8)
    delete client.msgs[message.author.id][getMessage]
    fs.writeFileSync('./msgs.json', JSON.stringify(client.msgs))
    message.channel.send(getMessage + ' has been deleted.')
  }

  if (message.content == `${prefix}list`) {
    var messageList = ''

    for (var key in client.msgs[message.author.id]) {
      messageList += key + ', '
    }

    message.channel.send(messageList)
  }

  if (message.content == `${prefix}help`) {
    message.channel.send("To send a message do: !write {messageKey} {message}\nTo get a message do: !get {messageKey}\nTo delete a message !delete {messageKey}\nTo view your messages !list");
  }
})

client.login('token')
Add the bot to your server
Now that we've written all of the code, it's time to add this bot to your Discord server!
Go here.

Add your permissions, click the link at the bottom, and choose what server you want to add it to!