

Converting words to colors is a difficult concept to wrap your head around when you first think about it, but that’s exactly what you’re going to do in this workshop. In just 20 lines of code, you’re going to build a website that allows you to type all over the screen and watch the color of your screen change based on the number of verbs, nouns, adjectives, and adverbs in the text.
Getting started
Create a new Repl.it project at repl.it/languages/html.
To make things a little easier for us, we’re going to be using jQuery, a popular JavaScript library that simplifies writing certain common JavaScript tasks. You’ll get to see how jQuery can be really useful throughout this workshop.
We’re also going to use WordPOS, a cool dictionary library that identifies the grammar type of a given word (e.g. noun, verb, etc).
Let’s start by importing these two libraries. Just before the end of the <head> tag of your index.html file, add these two lines:
<script src="https://code.jquery.com/jquery-3.4.1.min.js"></script>
<script src="https://cdn.jsdelivr.net/npm/wordpos-web@1.0.2/dist/wordpos.min.js"></script>
Typing on the screen
Great! Now that we’ve imported the libraries we need to make our website, it’s time to write some code.
In order to use our entire screen as our canvas for writing, we need to create a <textarea> in our HTML file and use CSS to make it fill the entire screen.
In the <body> of your index.html file, under the line where script.js is imported, add this line:
<textarea id="sentence" autofocus></textarea>
This creates a textarea element with the id “sentence”, and automatically focuses on it so that you don’t have to click on it to start typing. If you run your repl, you’ll see this textarea in the top left corner.
In order to be able to use this textarea as our writing canvas, we’ll need to do some CSS work. Namely:
- Remove the white background
- Remove the blue outline around the edges
- Remove the black border around the edges
- Make it fill the entire screen without overflowing
Start by adding
textarea {
}
to your style.css file.
To remove the white background, we use background: none;. To remove the blue outline, we use outline: 0;. To remove the black border, we use border: 0;. Add these three declarations inside the textarea block of your style.css file. When you’re done, the file should look like this:
textarea {
  background: none;
  outline: 0;
  border: 0;
}
When you run your repl, you should see that the textarea appears to have disappeared. But if you click at the top left corner of the preview, you’ll notice that you can still type. The textarea is still there—you’ve just made it invisible.
We still need to make the textarea fill the whole screen. Add width: 100%; and height: 100%; to the textarea block in your style.css file. While you’re at it, go ahead and also add font-size: 48px, which makes the font size bigger.
textarea {
  background: none;
  outline: 0;
  border: 0;
  width: 100%;
  height: 100%;
  font-size: 48px;
}
Your textarea still doesn’t quite fill the whole screen, though—these two properties only made it fill 100% of its parent element. In our case, this is the <body>, which doesn’t fill the whole screen. We ran into the same problem in the Splatter Paint Workshop—check it out for a clearer explanation of this concept.
To make the <body> fill the whole screen, simply add
html,
body {
  height: 100%;
}
to your style.css file.
When you run your repl, you’ll notice that the textarea fills the whole screen! But if you type too much, it’ll shift a little bit to the right, obscuring some of the text. We can fix this by adding padding: 0; to the textarea block.
Now the textarea fills the whole screen without overflowing!
Just to recap—this is what your entire style.css file should now look like:
html,
body {
  height: 100%;
}

textarea {
  background: none;
  outline: 0;
  border: 0;
  width: 100%;
  height: 100%;
  font-size: 48px;
  padding: 0;
}
Coloring our canvas
Now that we can write anywhere on our screen, it’s time to make use of the libraries we imported earlier.
Navigate to your script.js file and add the following:
const wordpos = new WordPOS({
  dictPath: 'https://cdn.jsdelivr.net/npm/wordpos-web@1.0.2/dict'
})
This initializes a new instance of the WordPOS library with a dictionary to identify words with.
Under this, add
$(document).ready(function () {})
This is how jQuery is initialized. Usually when you see a dollar sign in JavaScript, it’s a shorthand for jQuery.
Now, let’s write a function that updates the background of our page inside the jQuery function.
$(document).ready(function () {
  function updateBackground() {}
})
Inside the updateBackground function, add the line:
let sentence = $('#sentence').val()
This uses jQuery to get the value of our textarea, which if you recall, we gave the id “sentence”. You could replace $(“#sentence”) with document.getElementById(“sentence”), but the jQuery syntax makes it a little bit easier.
To get the number of each type of word used in the sentence, we need yet another function. Add the following inside the updateBackground function:
wordpos.getPOS(sentence).then(function (types) {})
As of now, this is what your script.js file should look like:
const wordpos = new WordPOS({
  dictPath: 'https://cdn.jsdelivr.net/npm/wordpos-web@1.0.2/dict'
})

$(document).ready(function () {
  function updateBackground() {
    wordpos.getPOS(sentence).then(function (types) {})
  }
})
Converting text to a color
The beauty of this workshop is that there are endless ways you can go about creating a color from all of this data, and each will produce a different result. I’m going to show what I personally came up with, but as you read the next steps, be actively thinking of ways you can change it to do something different.
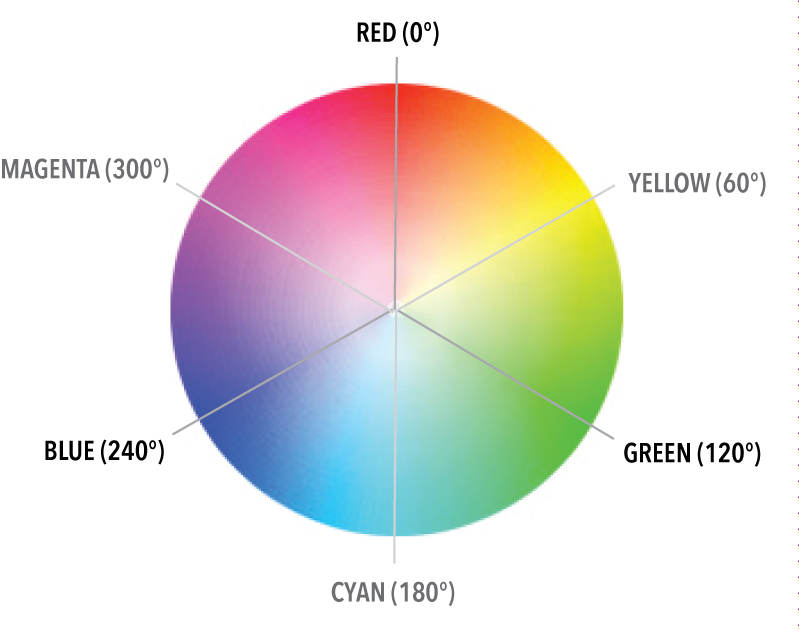
We’re going to be creating our color with the HSL (Hue, Saturation, Luminosity) color system. If you’re not familiar with it, all you need to understand for this demo is that the HSL system uses a color wheel, and you identify a color according to its position on the color wheel in degrees. Also important to note is that colors start a new cycle once you pass 360°. Just like a 60° angle looks the same as a 420 (360 + 60)° angle, 60° on the HSL color system is the same color as 420°: yellow.
Because we can simply identify a color with a number, one way we can process our data is by adding up the frequency of each type of word. Using the WordPOS library, getting the total number of word type is as simple as types.[type].length; for example, types.verbs.length.
Create a variable that adds up the frequency of every type of word.
var color =
  types.verbs.length +
  types.adverbs.length +
  types.nouns.length +
  types.adjectives.length +
  types.rest.length
Now that we have a number that we can create an HSL color with, let’s create it and change the background color. This is where jQuery becomes really useful: we’re going to change the CSS on our page right from our JavaScript file!
$('body').css('background-color', `hsl(${color}, 100%, 50%)`)
(Note: in JavaScript, you can use back-ticks instead of quotation marks and concatenate strings using the \${variable} syntax. The dollar sign next to hsl is unrelated to jQuery. Learn more about this syntax here.)
Here’s what your entire script.js file should look like after this:
const wordpos = new WordPOS({
  dictPath: 'https://cdn.jsdelivr.net/npm/wordpos-web@1.0.2/dict'
})

$(document).ready(function () {
  function updateBackground() {
    let sentence = $('#sentence').val()

    wordpos.getPOS(sentence).then(function (types) {
      var color =
        types.verbs.length +
        types.adverbs.length +
        types.nouns.length +
        types.adjectives.length +
        types.rest.length

      $('body').css('background-color', `hsl(${color}, 100%, 50%)`)
    })
  }
})
We’re almost done! The final step is to run the updateBackground() function once when the page loads and then each time a new letter is typed.
Right before the last closing curly brace, add these two lines:
updateBackground()
$('#sentence').on('keydown', updateBackground)
Now, your script.js file should look like this:
const wordpos = new WordPOS({
  dictPath: 'https://cdn.jsdelivr.net/npm/wordpos-web@1.0.2/dict'
})

$(document).ready(function () {
  function updateBackground() {
    let sentence = $('#sentence').val()

    wordpos.getPOS(sentence).then(function (types) {
      var color =
        types.verbs.length +
        types.adverbs.length +
        types.nouns.length +
        types.adjectives.length +
        types.rest.length

      $('body').css('background-color', `hsl(${color}, 100%, 50%)`)
    })
  }
  updateBackground()
  $('#sentence').on('keydown', updateBackground)
})
When you run your repl, you should be greeted by a blank red screen. Click on the preview and start typing a bunch of words. You should see the background color change as you type each word!
Hacking
Your journey is far from over. There are endless ways you can make this your own. Here are a few suggestions:
- If you feel like the background color is changing too slowly, try multiplying your
colorvariable by a number so that it goes around the HSL color wheel more quickly. - Why make your background only one color? How about using the CSS linear-gradient function? Check out what I did for an example of what this looks like. There are many, many different ways you can make a gradient!
- I kept the saturation and luminosity of my color at 100% and 50%, but that doesn’t mean you have to! Try changing those numbers around and see how many new colors you can create.
- Change the font and size of the text in the textarea
...and much, much more!
Your new task is to hack away at this project until it looks noticeably different from this demo and is totally your own. Go crazy, and good luck!