

Overview
Meme songs are everywhere! I bet you've been rickrolled at least once, or heard All Star/the Coffin Dance around the internet. In this beginner workshop, you'll be building/coding an Arduino circuit that will be able to play music!
We are going to use Tinkercad's interactive circuit builder, which is excellent; it's like building an Arduino circuit in real life. With the expertise you gain from building this circuit online, recreating it with physical components should be a breeze!
What You'll Learn
- How to wire a circuit, taking into account ground/power/signal
- How to code in the Arduino C language
What You'll Need
- Extremely basic knowledge of any programming language, does not have to be Arduino C
- Basic knowledge of music notes
Final Circuit
- Here's the demo/final code: demo
Setup
Let's get started! Head over to tinkercad and register for an account in the top right. You should then be redirected to a dashboard, at which point you can create a new circuit diagram. Refer to the GIF below if you're having trouble:
The Physics of Music
Music, in general terms, can be described as sound. Very pleasant, bop-worthy sound! If we were to abstract sound even further, it can be thought of as waves that look like this:

Basic science lesson time! The humps of the wave are called wave crests, and the valley are troughs. Wavelength is the distance between two adjacent crests on the wave. The important part, though, is the frequency. This is how many times a wavelength passes a fixed point in a given amount of time--frequency is measured in hertz.
What's the point, you say? The frequency of the wave is directly related to what you hear! The higher the frequency, the higher the pitch, and vice versa. This forms the basis for music notes.
This is important because Arduino has no idea what a music note is, and neither does the buzzer we'll be programming. To specify what note we want to play, we need to give Arduino the hertz value. For example, the note C4 is about 261.6 hz! For a full list of notes and their frequencies, check out this link. We'll be using that list soon to arrange the coffin dance.
Building the Circuit
Now that we have a new project window open, you'll see multiple things:
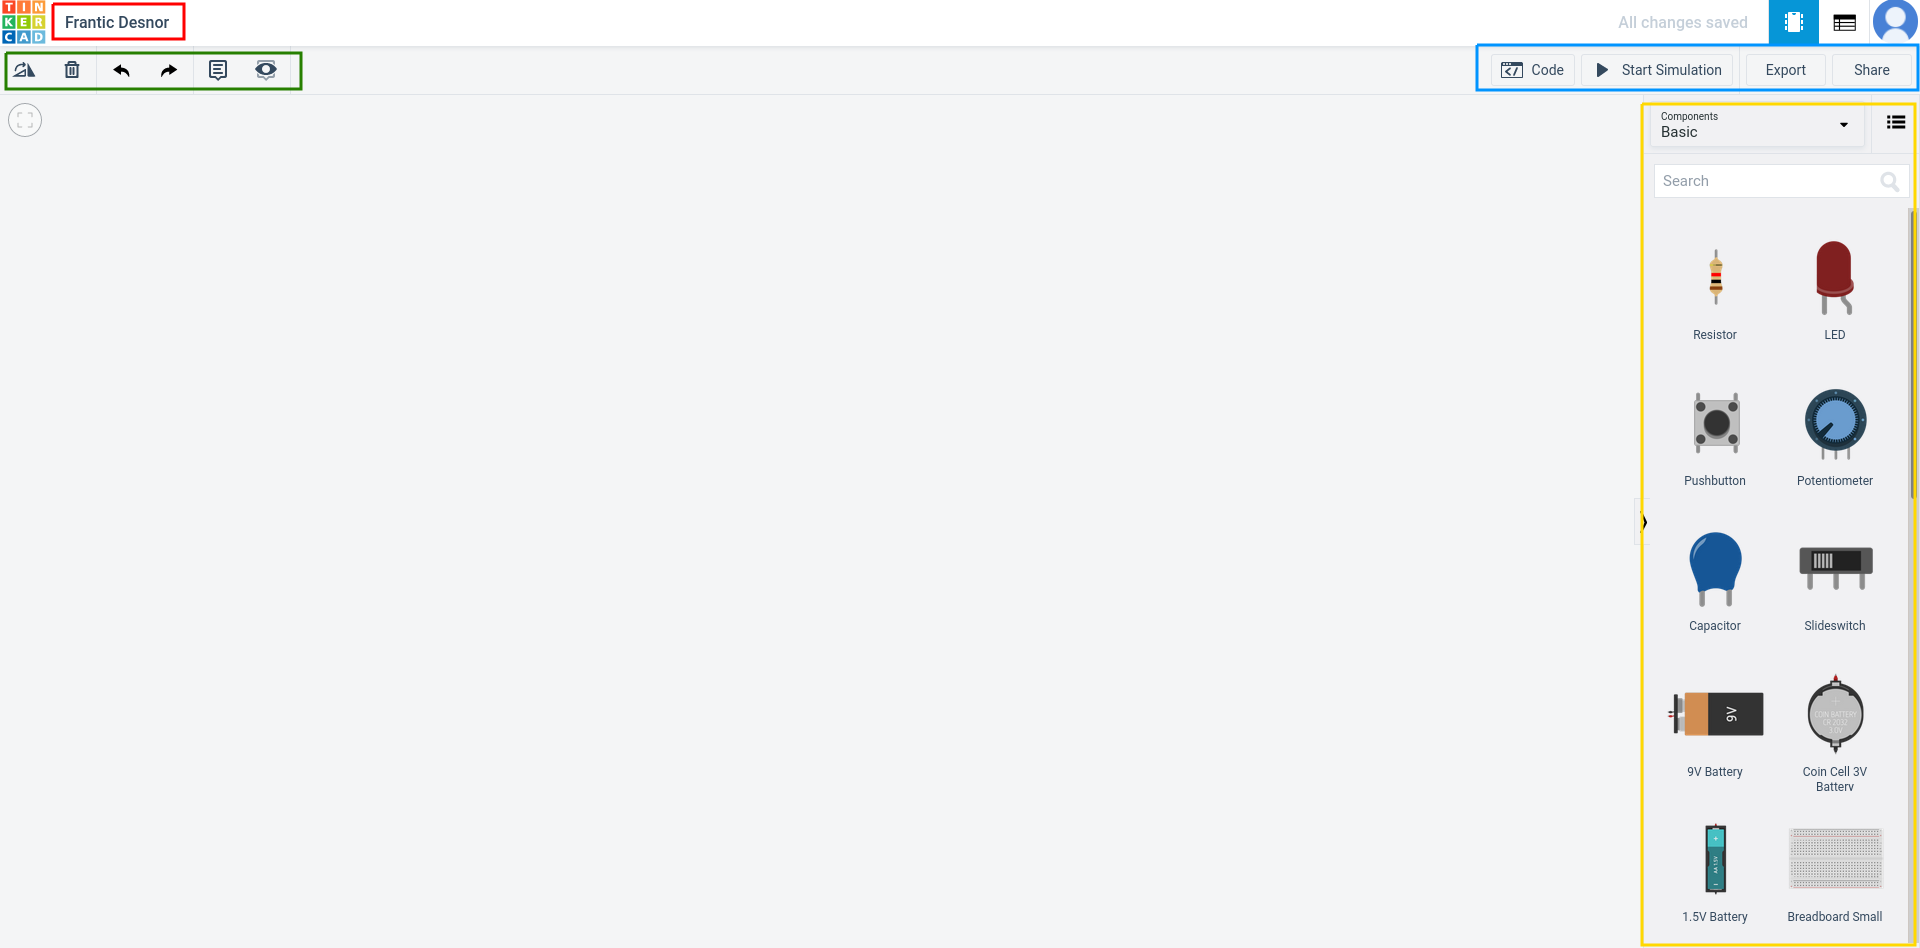
Here's a rundown of the items in each rectangle, from left to right:
Red : the name/title of your project
Green : a few actions pertinent to devices, such as rotate, delete, undo/redo, etc.
Blue : the code window toggle button, simulate button, and methods to export/share
Yellow: the components window with a huge variety of devices to use
Now, we have to do two things to start off. Rename the project by clicking the name in the top left, and drag in an Arduino from the left components bar!
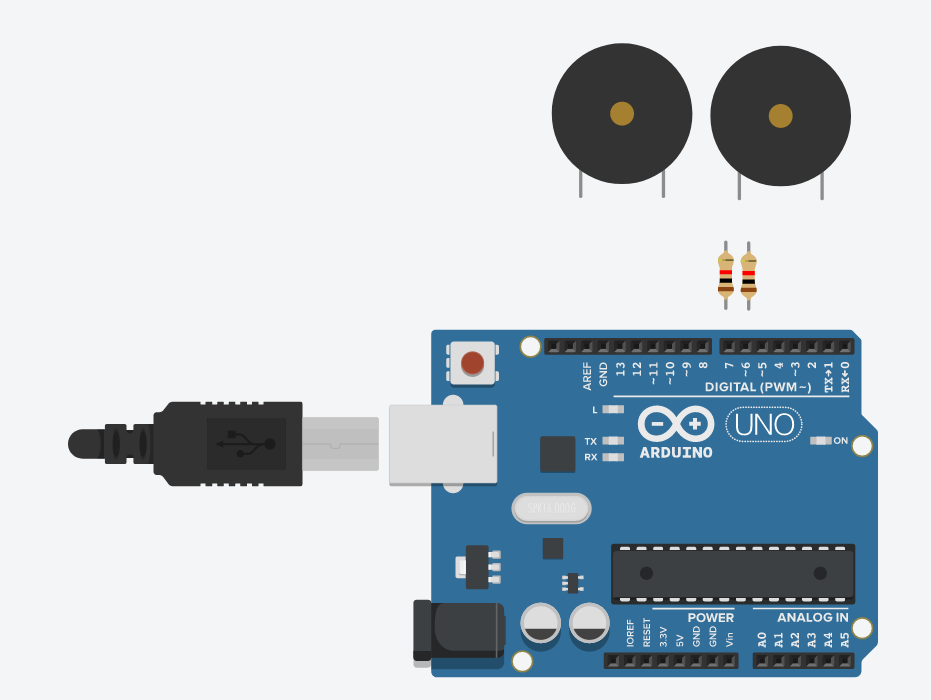
We also need to add the components that will be making music in the first place--piezos! Piezo is short for piezoelectric speaker, an oscillating circuit that projects a sound wave. Go ahead drag two piezos into the main view, along with two resistors. If you can't find them, use the search bar.
You should have this so far:
Like any electrical device, a circuit needs to be completed to activate it. In the piezo's case, it needs a signal (aka power) and ground.
Ground always connects to the Arduino's ground port (next to pin 13 at the top of the board), but since a signal is variable, it can be connected to any of the digital pins.
I won't go into detail about digital pins and analog pins, but you can definitely learn more here. All you need to know for this workshop is that the hertz value inputted into code is going to be sent over the signal pin to the piezo.
Next, we need to configure the resistors to the right resistance value. This ensures the signal sent to the piezos does not exceed a certain limit and is smooth. Click both resistors and change the resistance values in the box in the top right to the below:
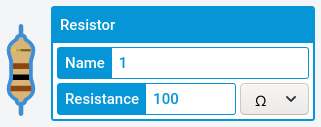
You can ignore the name field, as that isn't important to the circuit, just for labeling purposes. Make sure that the dropdown is set to plain ohms (symbol for electrical resistance).
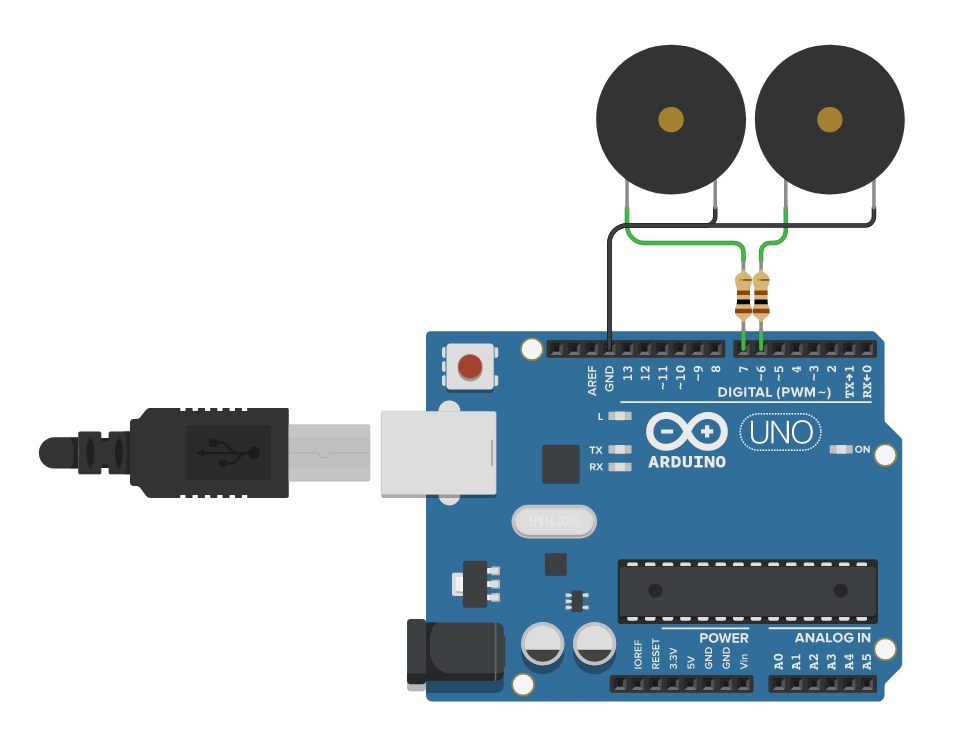
It's time to wire up the circuit! By clicking a port on either the piezo, resistor, or Arduino, you should be able to create a wire. Wire the circuit as below:
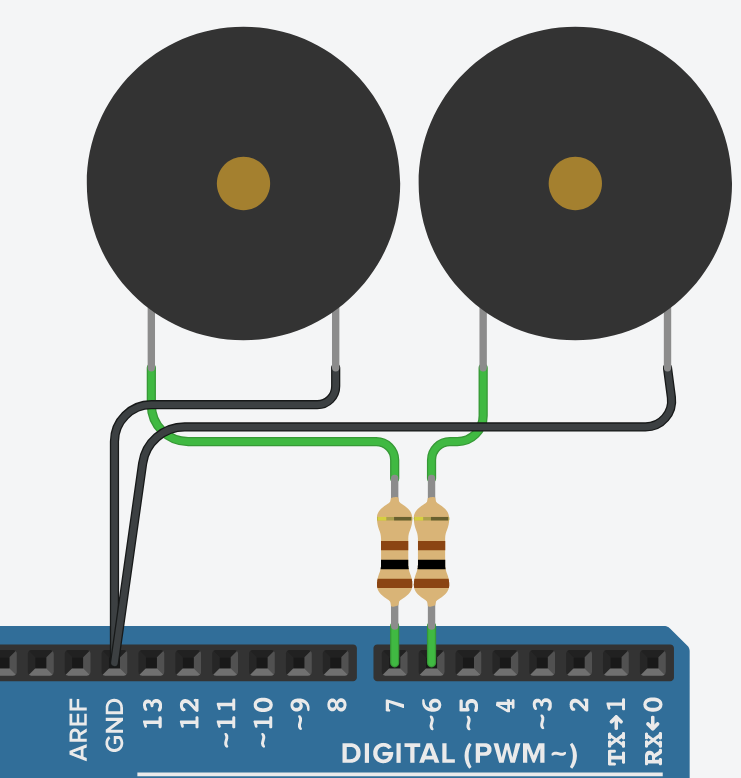
Let's go over the elements of this diagram. Following pin 6, the signal wire first connects to a resistor, which connects to one piezo's signal input. The piezo's other port routes the electricity to ground, completing the circuit. The mini-circuit is the same for pin 7! Don't be intimidated by electronics, in hindsight it can be very simple.
Hooray! You finished building the circuit. Time to play some meme music!
Programming the Circuit
Remember the code window toggle button in the blue rectangle in the picture earlier? Go ahead and click that and toggle from block code to text code. Here's how to do that:
We're now ready to start coding! Go ahead and delete everything in the window and type out the following:
void setup() {

}

void loop() {

}
The setup() function is only run once during the entire runtime: at the beginning. You can think of it as setting up the program for what's to come.
The loop() function is run probably hundreds of times a second! It loops repeatedly, until the program either crashes or decidedly ends.
For the purposes of this workshop, you don't need to know what void does; if you want to, check this out: identifier (the link takes you to a Java tutorial, but in terms of identifiers, everything is the same)
In the setup() function, we have to do 2 things:
- tell the Arduino we're going to use pin 6
- tell the Arduino we're going to use pin 7
To do this, we need to specify that both those pins are going to be outputs, not inputs (since we're transmitting sound from the Arduino to the piezos):
void setup() {
  pinMode(6, OUTPUT);
  pinMode(7, OUTPUT);
}
There are multiple pin modes besides OUTPUT, we just won't use them for this workshop. To learn more, check out this link.
Let's try making some basic sounds! In the loop() function, add the following and hit the Start Simulation button when done. You should hear one note being played repeatedly!
void loop() {
    tone(6, 261, 1000);
    delay(1000);
    noTone(6);
    delay(200);
}
Line by line:
- we call a built-in tone function that takes the following as parameters (left to right): pin number, hertz (note), duration (milliseconds)
- delay the program by 1000 milliseconds to allow the tone to play out
- disable the tone from the piezo connected to pin 6
- delay again for 200 milliseconds to allow for a grace period between notes
Now, the point of having two piezos is for the sound to alternate between them! To do this, we need to keep track of the current speaker being used. Go ahead and add a variable that does this at the very top of the file, we'll come back to it later:
int currentSpeaker = 6;

void setup()
{
  pinMode(6, OUTPUT);
  pinMode(7, OUTPUT);
}
void loop() {
    tone(6, 261, 1000);
    delay(1000);
    noTone(6);
    delay(200);
}
This code works, and we can by all means create a song with this, but typing out four lines per note is going to be a major hassle. This is where functions, reusable pieces of code, come in!
Let's create a new function underneath setup() , called play() that takes in two values, hertz and wait time in milliseconds.
void play(float hz, int wait) {

}
Let's also assume we're only going to be using the piezo on pin 6 for now. Add the following inside the play() function:
void play(float hz, int wait) {
  tone(6, hz, 1000);
  delay(200);
  noTone(6);
  delay(wait);
}
What did we do here? Since we're only using the piezo on pin 6, why do we have to specify it all the time? To make our lives easier, we can add that manually to the function so when we call play(), no pin number is required. We also assume the delay and note length, as those will probably stay constant during this workshop.
Let's test this function out! Delete all the code inside loop() , and add this instead:
void loop() {
  play(261, 500);
}
Hit the Start Simulation button, and you should hear a note playing repeatedly. This time, we only did it in one line!
How can we modify this now to alternate sounds between both piezos? Using if statements! Modify your play() function as below:
void play(float hz, int wait) {

  tone(currentSpeaker, hz, 1000);
  delay(200);
  noTone(currentSpeaker);
  delay(wait);

  if(currentSpeaker == 6) {
    currentSpeaker += 1;
  } else {
    currentSpeaker -= 1;
  }
}
What did we do here? Instead of setting the piezo manually, we have the currentSpeaker variable do it for us! Since the variable is set to either 6 or 7, it's just a matter of switching between them every time the function is called. This is done with the if statement at the end; if the value is 6, it changes it to 7, and if it's 7, it changes it back to 6.
Hit Start Simulation once more and you should see the sounds alternating from both piezos!

The hard part is done, let's make some music now! Referring to this link with all the possible notes and frequencies, here's how to play the coffin dance (replace loop() contents):
void loop() {

  play(329, 200); // F-4
  play(329, 70);  // F-4
  play(493, 100); // B-4
  play(440, 200); // A-4
  play(392, 200); // G-4
  play(369.99, 100); // F#-4
  play(369.99, 100); // F#-4
  play(369.99, 120); // F#-4
  play(440, 150); // A-4
  play(392, 80); // G-4
  play(369.99, 100); // F#-4
  play(329, 150); // F-4
  play(246.94, 150); // B-3


  play(392, 70); // G-4
  play(369.99, 70); // F#-4
  play(392, 70); // G-4
  play(369.99, 70); // F#-4
  play(392, 70); // G-4


  play(329, 150); // F-4
  play(246.94, 150); // B-3


  play(392, 70); // G-4
  play(369.99, 70); // F#-4
  play(392, 70); // G-4
  play(369.99, 70); // F#-4
  play(392, 70); // G-4
}
Go ahead and paste that in and hit Run Simulation if you want to hear the coffin dance. I put in the note names in the comments besides each note so you can reference the note frequencies page above to create your own songs!
The final code is available in the demo at the top of this page. If you have a syntax error or a logic error, go ahead and cross-check against that.
Further Hacking

This program went over the basics of how to make music; there's a lot to be changed! See if you can mess with note durations to create chords (since Arduino does not support playing multiple notes at once), arrange your own songs, etc. If you think your creation is epic, please do share it with the Hack Club community!
Here are some branches of the project that build upon the code written in this workshop:
- Third Piezo: demo and code
- All Star, by Smash Mouth: demo and code
- Fake Chords: demo and code